Quick Start
Documentation
Step 1: Signing up
To be able to start using our Click to Translate API you first have to sign up. Don’t worry, it’s free! You will even be able to use our services for free.
Create an Account NowStep 2: Add an Access Token
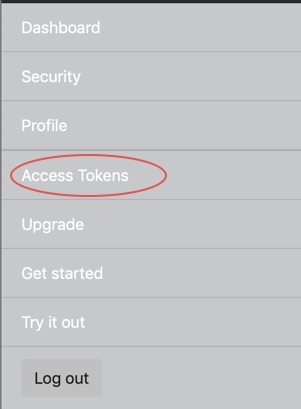
After signing up with us you will automatically enter the Console. Click on Access Tokens in the menu on the left-side.
In the page that appears on the right click on the create button.

After clicking on the button an access token will appear in the table right below the button.

The access token you have created will grant you access to our API from our WordPress Plugin or our Javascript API.
Step 3: Add the WordPress Plugin or the Javascript API to Your Website
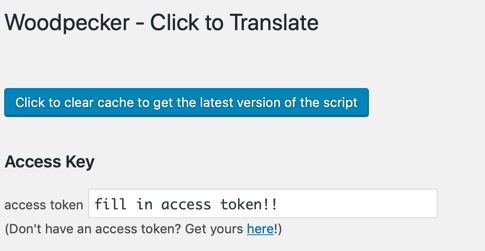
When using our Click to Translate API with WordPress simply install our Click to Translate Plugin from the WordPress store. Go to the settings page the Click to Translate plugin and copy the API Key into the field that says: “fill in access token!!”.
Our Click to Translate button will then appear on your website. Before our API works you will first have to complete step 4 of this setup guide.
If you want to use our Javascrip API instead then copy paste the code below and replace the text “Your access token here” with the access token created in step 2.
<script
  class="wlinit"
  data-token="Your access token here"
  data-autoload="1"
  data-enable="1"
  data-renderbutton="1"
  data-enableInstruction="1"
  src="https://translate.woodpeckerlearning.com/cdn/v5.1/js/WLlookup.js">


</script>
Then copy the code for the on/off button to your website:
<wl-div class="wlapi_toggle_button_container"><wl-div>
Copy the stylesheet as well:
<link
  rel="stylesheet"
  href="https://translate.woodpeckerlearning.com/cdn/v5.1/css/WLlookup.css"

/>
Step 4: Whitelist your domain
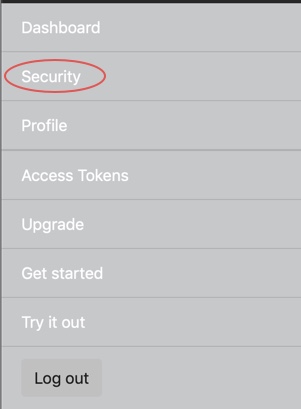
In order to protect your account you can only use our Click to Translate API on the domain you specify. To enter this domain navigate to the Security page.
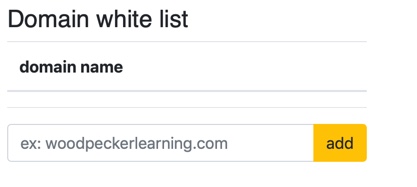
Next, enter your domain and click on the add button.
Congratulations! You are all set, Click to Translate will now work on your website.
WordPress Plugin
Documentation
Getting Started
In order to use our WordPress plugin you need to do two things: download the plugin from WordPress store and follow the quick start guide.
Create an Account NowWordPress plugin settings
In the WordPress plugin there are a few settings that can be changed, they are discussed here.
Clear cache
Our WordPress plugin sideloads extra code required to make our Click to Translate API work. This code is cached inside the plugin so it can be delivered faster to your website’s visitors.
In order to ensure that you have the latest version of our script it is advisable to click the button below every now and then.

Access Key
After you signed up with us you can create an Access Token also known as an Access Key. After you have created this key it needs to be copied into the field below.

Enable / Disable
The enable / disable section contains a few options you can turn on or off.
The first option Load initialized javascript is only important for developers and is most likely not for you. Simply leave it checked.
The next option Enable Click to Translate functionality on website / page enables our Click to Translate API by default if this option is checked. If this option is not checked your users will first have to click on our Click to Translate Button that is displayed on every blog.

Location of the Click to Translate Button
The Click to Translate button normally appears once under the first heading of every blog post. Please make sure that the Add Click to Translate button above content box is checked.
In order to add multiple buttons you can add the text:
[wl-lookup button]
at multiple locations throughout the text in a blog.
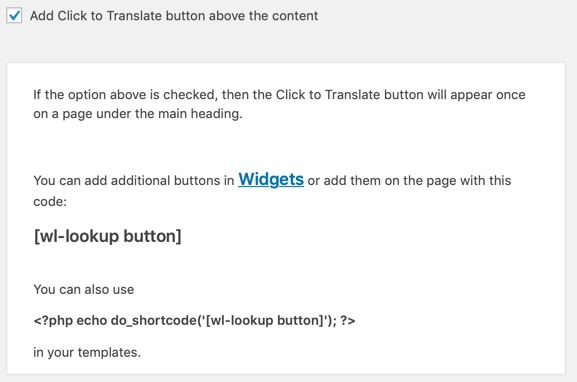
You can also select in what kinds of content the Click to Translate button appears.

Javascript API
Documentation
Getting Started
In order to use our Javascript API you need to do two things: create an account with us and follow the quick start guide.
Create an Account NowThe Code
In order to use our Click to Translate API you will need to copy our code into your website first. Our code consists of three snippets:
- The script snippet,
- The on/off button snippet,
- The stylesheet snippet.
All three pieces of code are discussed below.
The Script Snippet
The script snippet contains six attributes: class, data-token, data-autoload, data-enable, data-renderbutton, and src. The class and src attributes should not be changed.
The data-token attribute is where you fill in you access token after you have signed up with us and followed the quick start guide.
The data-autoload attribute is meant for development purposes and should normally always be set to 1.
The data-enable attribute indicates if the Click to Translate service is turned on (1) or turned off (0) by default.
The data-renderbutton attribute indicates if the on/off should be displayed on the page or is hidden.
The data-enableInstruction attribute indicates if the first-time instrunction should be shown or not.
<script
  class="wlinit"
  data-token="Your access token here"
  data-autoload="1"
  data-enable="1"
  data-renderbutton="1"
  data-enableInstruction="1"
  src="https://translate.woodpeckerlearning.com/cdn/v5.1/js/WLlookup.js">


</script>
The Button Snippet
Insert the line of code below into your HTML page wherever you want the button to appear on your page. The button will appear only if the data-renderbutton attribute in the snippet above is set to “1”.
<wl-div class="wlapi_toggle_button_container"></wl-div>
The Stylesheet Snippet
The stylesheet needs to be inserted on your webpage in order to give our button and pop-up box the correct layout. Simply put it in the header of the page you are using our Click to Translate service on.
<link
  rel="stylesheet"
  href="https://translate.woodpeckerlearning.com/cdn/v5.1/css/WLlookup.css"

/>
The Console
Documentation
The Console
After signing up with us you will automatically enter into the Console. In the console you can see usage statistics of the Woodpecker Click to Translate API and account statistics.
The following functionality is available from the left-hand menu in the console:
- Dashboard,
- Security,
- Profile,
- Access Tokens,
- Upgrade,
- Try it out.
All items are discussed below.
The Dashboard
In the Dashboard you can see your current usage per month and per minute and the plan you are currently on.
Translations this Minute
The usage per minute displays the amount of translations made in the current minute and resets to zero every minute.
Translations this Month
The usage per month displays the amount of translations made in the current month and resets to zero every month.
When you are using our service for the first time both values will be zero.
Security
In the security settings you can view your Client ID and Client Secret. At this moment there is no use for them yet, but they might come in handy in the future. There is also a settings called domain white list.
Domain white list
The domain white list shows all your domains from which you can call our Click to Translate API. To be able to start using our service this field needs to be filled out with the website or domain on which you will be using our service.
Profile
On the profile page you can update your password and let us know more about yourself.
Access Tokens
On the access tokens page you can create access tokens that identify you when you are using our WordPress Plugin or our Javascript API.
Every request you make to our Click To Translate API will contain that access token. Using the access token we know that it is a user on your website making a request.
You can insert the access token into the WordPress Plugin on its settings page, or in the Javascript Code. See the WordPress Plugin and the Javascript API documentation for more information.
Upgrade
In the upgrade section of the console you can upgrade or downgrade your plan, at this moment we only have a Free Plan and a Premium Plan available. We are hard at work to create more plans.
Try it Out
The try it out section allows you to try out our Click to Translate API. Simply turn the service on by clicking on the button and click away on the words in the text below.